Here ya go
1. Disconnect the car battery at the ground cable (if not already done).
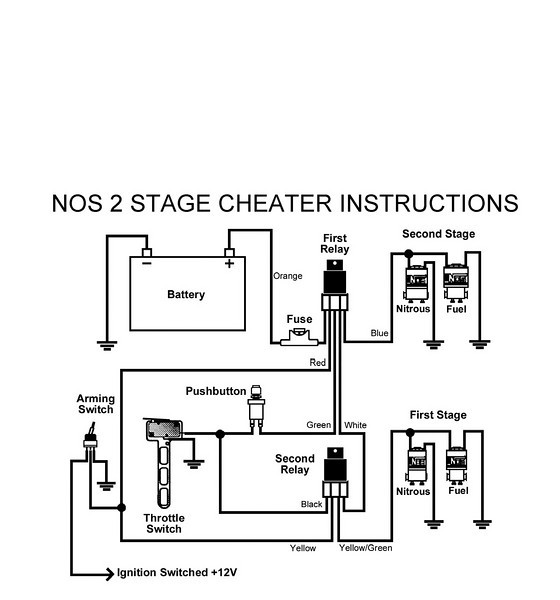
2. Install the relay (34) with the orange wire connected to the inline fuse assembly close enough to the battery to be easily connected.
3. Install the second relay (34) near the first relay.
4. Connect the white wires from the relays together.
5. Connect one wire from each solenoid to a ground.
6. Connect the green/yellow wire from the second relay to one wire from each small solenoid (17,21).
7. Connect the blue wire from the first relay to the remaining wire on the larger solenoids (9,26).
8. Install the arming switch (30) within easy reach of the driver.
9. Connect the red wire from the first relay and the yellow wire from the second relay to the arming switch #2 (center) terminal.
10. Connect the arming switch #1 terminal to an ignition-switched +12V source.
11. Connect the arming switch #3 terminal to the ground.
WARNING! Binding or dragging of the throttle linkage will create a potentially dangerous stuck-throttle condition. Ensure
that the microswitch does not interfere with normal throttle linkage operation.
12. Install the throttle microswitch (32) where it will be triggered by the throttle linkage at wide-open throttle.
Figure 9 Two-Stage Competition Cheater System Wiring Diagram
13. Connect either terminal on the throttle microswitch to a ground.
14. Install the activation pushbutton (31) in a convenient position for the driver.
15. Connect the green wire from the first relay to either terminal on the activation pushbutton.
21
16. Connect the remaining activation pushbutton terminal and the black wire from the second relay to the open terminal on the throttle
microswitch.
17. Connect the open lead from the in-line fuse assembly to the battery positive (+) terminal.
18. Reconnect the battery.
HINT: If the arming switch has been connected to a +12V ignition-switched source, nothing will work if the key is off, regardless of the
arming switch position. Neither system can operate if the arming switch is off.
4.6 Electrical System Checkout
1. Ensure that the nitrous bottle valve is closed and the fuel pump(s) is off.
2. Turn the arming switch off.
3. Press and hold the throttle full open. The first-stage solenoids should click.
4. Press and hold the activation pushbutton. The second-stage solenoids should click.
5. Release the activation pushbutton. The first-stage solenoid should click again.
6. Release the throttle.
Chapter 5 Preparing for Operation
5.1 Checkout Procedure—Multiple-Carburetor Competition Cheater System
After you have completed the installation of your NOS Multiple-Carburetor Competition Cheater System kit, perform the following
checkout procedure before operating your vehicle.
NOTE: Before performing steps 1-4, make sure that the nitrous bottle valve is closed and the main nitrous supply line is empty.
1. Close the N2O bottle valve. Empty the main N2O feed line.
2. Turn on the fuel pump.
3. Check all the fuel lines and fittings for leaks.
4. Start the engine.
5. Turn the arming switch on.
6. Set the engine speed at 2000 rpm.
7. Briefly depress the activation arm on the microswitch. The engine speed should decrease if the fuel delivery system is performing
properly. If it is not, refer to Appendix A, Troubleshooting Guide.
8. Open the nitrous bottle valve.