New guy 79 factory 4 speed wagon.

Mighty

Amateur Racer
Thread starter
Apr 14, 2023
208
5
18
37
On another note, I’m getting ready to start running some wire. My brother is the brains behind this but we were discussing routing options. This is the $60 relay I bought and the only 2 red wires from the main bulkhead in the firewall that I’m going to use. I have 2 60 amp fuses. My brother ordered the blue plug from GM which he somehow knew would plug right into this relay. 1 wire to the ignition and one to the fan control. I think I have a decent idea of where to mount the relay back up near the headlight/core support area.
IMG_8561.jpeg
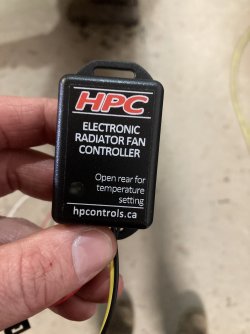
This is the fan controller. The big plug had 5 wires in originally but we removed 2 of them since they weren’t going to be used. The yellow and black wires tie into the temp sensor in the cylinder head.
IMG_8562.jpeg

IMG_8565.jpeg

The controller has 2 screws holding the back cover on. Open it up and there’s 4 temperature settings so you can choose where the fans come on. It’ll probably be mounted inside under the dash some place. I have a spool of 10 gauge wire which I think would work ok but my brother suggested I buy some 8 gauge and run a wire from the alternator to the battery, then another one from the battery across to the power in stud on the relay I pictured above.
 

Attachments

  • IMG_8565.jpeg
    IMG_8565.jpeg
    1.7 MB · Views: 12

t5montecarlo

MalibuRacing Junkie
Oct 21, 2007
4,665
32
48
Lederach, PA
garage-scene.com
Crawled back under tonight and was looking at the “loom” I guess you would call it? That I have circled in the photo that you posted. I’m probably going to pull the big metal bracket back off that goes just above the steering column and look around. I had it off to get a little better access to the speedometer cable. Get it out of the way and compare what I see to your pictures.
I feel that metal bracket is there to prevent speedometer tampering. I see no other value in it. It does get in the way. It can be permanently removed, but the column will be a little higher without it, so it won't be centered in the round hole molded in the dash parts. A washer will fix it.
 

t5montecarlo

MalibuRacing Junkie
Oct 21, 2007
4,665
32
48
Lederach, PA
garage-scene.com
Your wiring is moving right along, which is good.

From your pictures, you are missing the upper clutch pushrod boot, unless you removed it. You will want that boot to keep fumes out of the interior.

You are also missing the windshield washer reservoir, unless you removed it.
 

Mighty

Amateur Racer
Thread starter
Apr 14, 2023
208
5
18
37
Dang you sure do know these cars. There’s currently no windshield wipers or anything on it. I can remember years ago coming home from race track it started to rain and we pulled over into a motel parking lot until the storm passed. I’ll be looking around at my parents eventually to see if I can find them
 

Mighty

Amateur Racer
Thread starter
Apr 14, 2023
208
5
18
37
Was just standing under the car loosening control arm bolts with my old man and he didn’t like how easily this rod moved around inside of the brand new clutch fork that I bought off of ss396.com so we adjusted the nut and put it back in. I’ve been googling the “clutch return spring” and they have one on ss396.com that looks nothing like the one I have. When we were tearing it apart someone mentioned that it didn’t look like the original spring so I think I’m just going to order it up. Also I was sitting in it pushing the clutch and my brother is saying it looks like there’s some slop in the Z bar. Would I be better off to buy a whole new Z bar at this point or is there a way to rebuild them? Ss396 has a Gbody Z bar for $150 which isn’t bad but everyone’s asking me to ask if they’re rebuildable. I’m going to order the spring for sure and at this point I think it’ll be easier and quicker to buy a new bar.
IMG_8570.jpeg
 

Mighty

Amateur Racer
Thread starter
Apr 14, 2023
208
5
18
37
Nevermind, did some more googling and found rebuild kits and videos on how to do it. I’m going to call tomorrow and make sure the new z bar is complete tomorrow
 

t5montecarlo

MalibuRacing Junkie
Oct 21, 2007
4,665
32
48
Lederach, PA
garage-scene.com
The worn swivel in your picture is inexpensive and may still be available from GM (PN 3840845); it is the same as was used in earlier GM cars. The threaded pushrod is unique to the 1978-1981 A body; it is not the same as the earlier GM cars. The older GM cars used a shorter pushrod.

One hole is to "gage" the pushrod length. With the swivel in the gage hole, you remove freeplay and then put the swivel in the other hole. Or, you could give the pedal about 1 inch of freeplay...you should get the same result.

The zbar (technical term is bellcrank) is not rebuildable, but you can probably buy the ball ends that support it on either end as well as the plastic sockets that the ball ends fit into. The lower pushrod swivel and the upper pushrod will wear first. If the bellcrank holes are worn you can replace it (pricey) or weld and drill, but you may lose some hardness unless you drill for a hardened bushing. The pedal seems to be soft and will rapidly wear the hole into an oval. It can be welded and drilled. If you have hardened bushings, it may be a good idea. I have never done that, but have thought it would be the best long-term solution. A friend had a 1979 Camaro and there was a hard plastic bushing in the pedal...and no wear on the pedal or the upper pushrod.
 

Mighty

Amateur Racer
Thread starter
Apr 14, 2023
208
5
18
37
Awesome thank you. I’m going to buy a z bar, the clutch linking that goes through the fire wall, a new return spring, and the adjustment nut. I was hoping to get some wiring done but everyone started to nit pick so here I am buying more parts lol. I think ss396 might have the proper clips too so I can throw away all of the cotter pins
 

MalibuRacing.com Gear

Stickers & Shirts!!

Latest posts