

A/C:
Since the truck and some other LSx engines use a low mount A/C compressor, that would have required a frame notch, I decided to go a different route. I found a solution on the LS1tech.com forums that some others were using. I got a A/C bracket from a pre-Vortec 4.3L S-10. It will bolt right to the head and align perfectly with the other accessories on the truck motor.
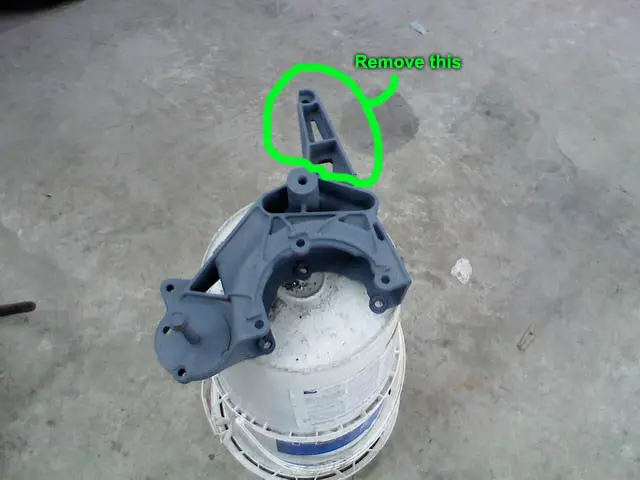
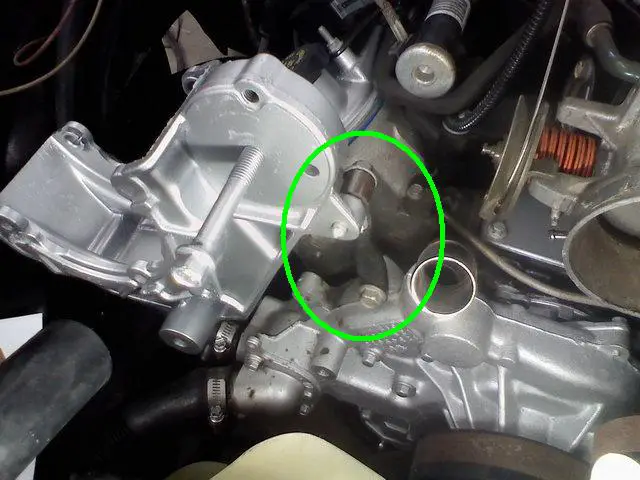
This is what the A/C bracket looks as it comes off the S-10. Notice that there is a small section that I have circled. This needs to be removed. I used a cut-off wheel to do this.
This is what the bracket looks like after removing the bottom section.
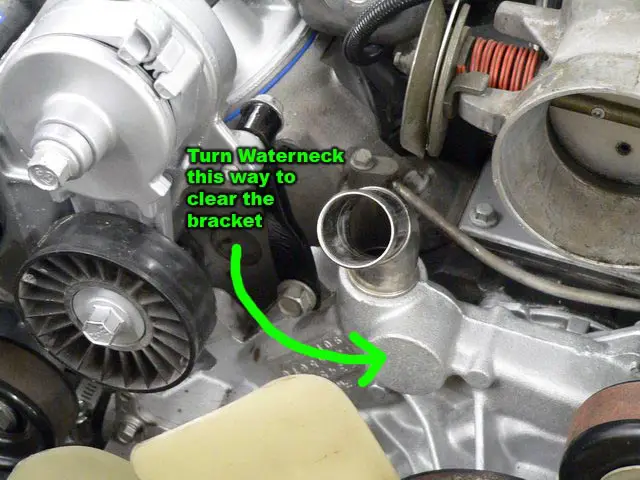
In order to clear the "new" location of the A/C compressor and bracket, the water neck needs to be turned counter clockwise. The waterneck is press into the pump housing. It was pretty simple to do this. I use a torch to heat around the aluminum at the base of the waterneck. I then inserted the handle of my floor jack into the waterneck and turned it so that it was facing straight forward.
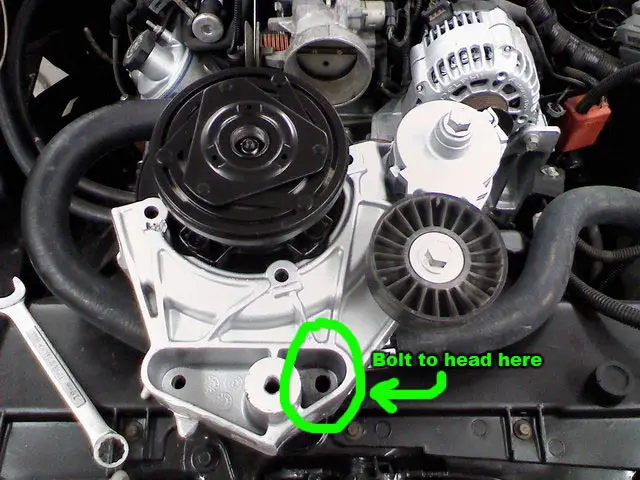
This is the hole I used to bolt the bracket to the head.
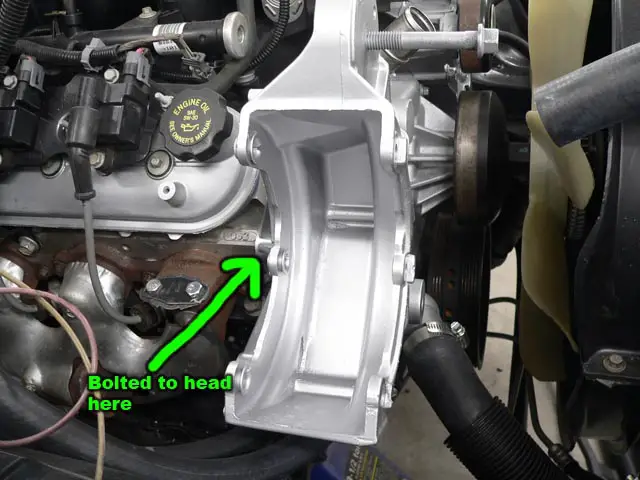
I bolted it to the accessory bolt hole in the head in the left top hand corner (facing the the engine).
You need to make a support that can locate the bracket the proper angle (left to right). You should mock this up to determine the correct position for a particular length accessory belt. Here you can see the support bar I created using pieces that I cut and welded from junk yard support bars.
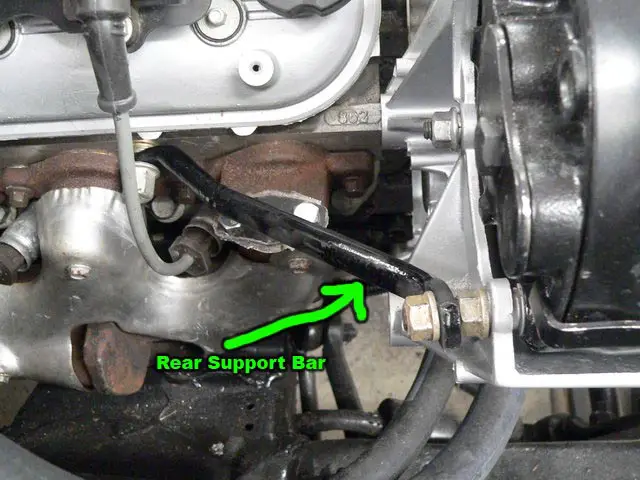
The bracket is supported in the rear by this brace I fabricated from pieces of junkyard parts. This prevents the bracket from moving front to back.
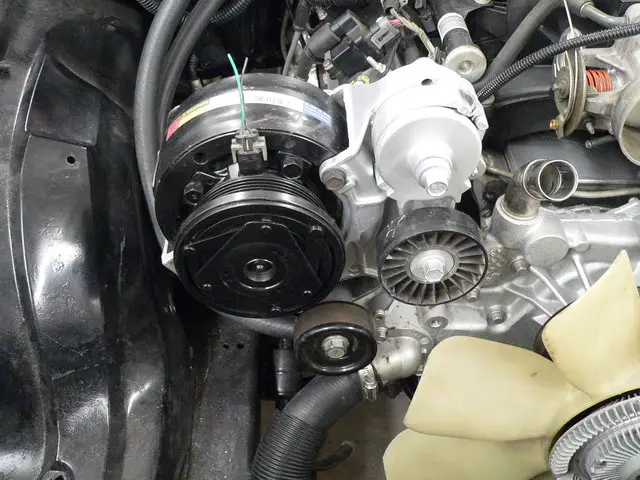
This is what it looks like when mounted. Notice you will need another idler pulley on the bottom to keep the belt clear of the thermostat housing and lower radiator hose. The A/C compressor is from a 1992 F-body (Camaro/Firebird). It has a different type of hose connection on the back (than 1979 Malibu), so I used the hose assembly for a '92 F-body. Just make sure you get a hose assembly with the correct connections for your application.
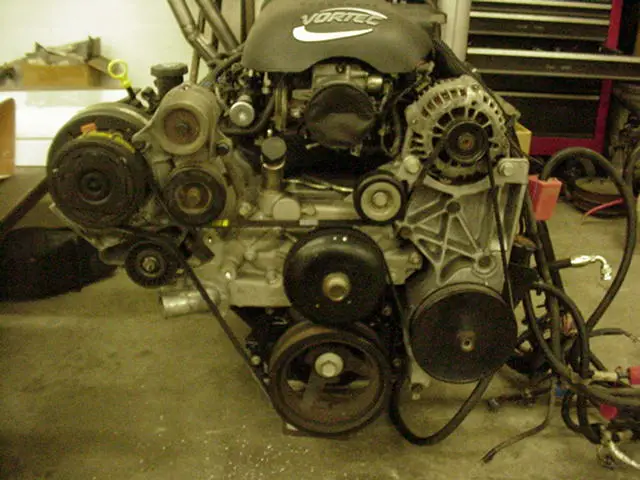
The final belt routing will look like this
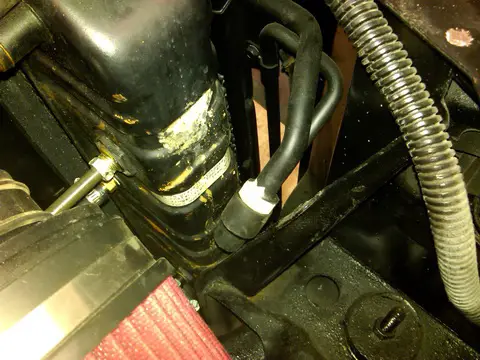
Since I used the 92 F-body compressor, I got the A/C compressor hose assembly for a '92 F-body, also. The line going to the condensor had to be shortened to prevent it from kinking. No biggie, I took it to a local parts house that makes/repairs A/C and hydraulic hose assemblies. The other line off the compressor bolted right to the evaporator with no modifications.
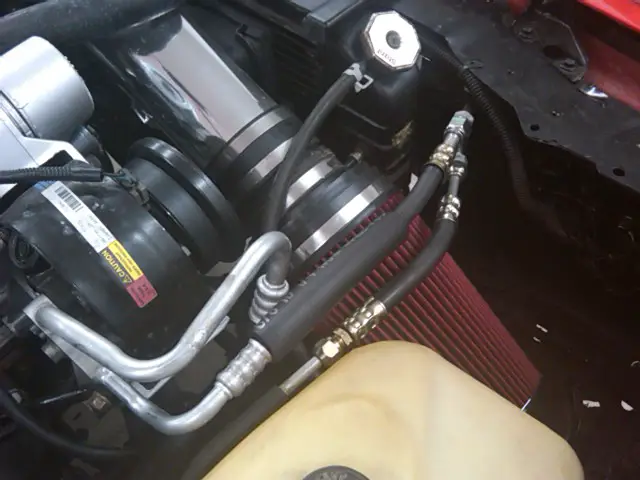
Here is another shot of the hoses going to the condensor. For the high pressure line (small line), I used my stock line and had the parts house shorten it to fit my application with the condensor fitting on the passenger side. It cost $31 to do both the compressor line and high pressure (liquid) line.
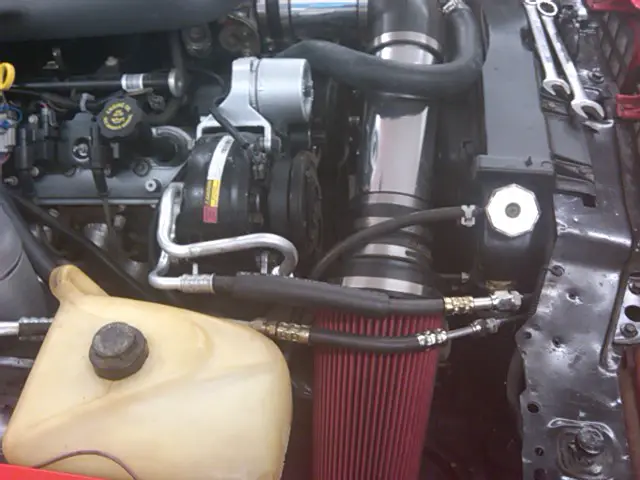
To keep all the A/C plumbing on the passenger side, I got a condensor for a 1987 Olds Cutlass. I was told 82-92 F-body (Camaro/Firebird) condensors will work as well. I had them bent down in this picture, because I planned on running the lines under the air filter, but I ended up bending the connections up and running the lines over the top of the filter.
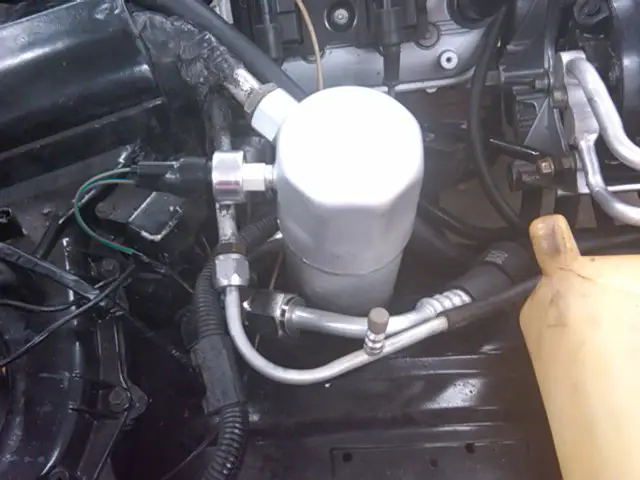
Here you see the dryer. I got a new one for a 1985 Monte Carlo. The one from a 1979 Malibu should work fine. You can see the high pressure line with the the schrader valve port, connected to the evaporator.
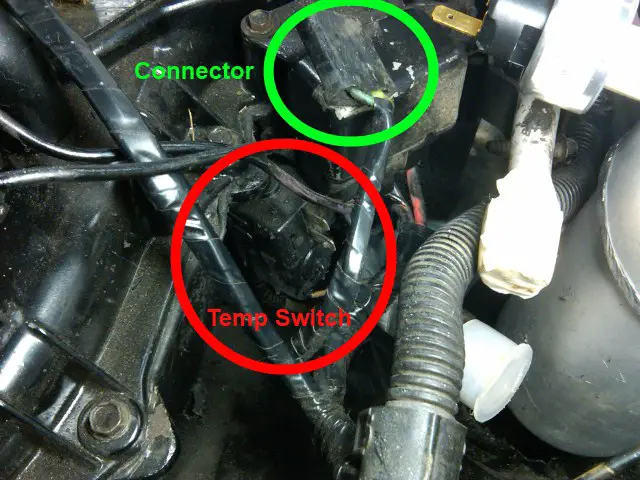
In this picture, you see the temperature sensor with the electrical connector disconnected. The temperature switch is used to cycle the compressor. I don't want to use this setup because it is old.
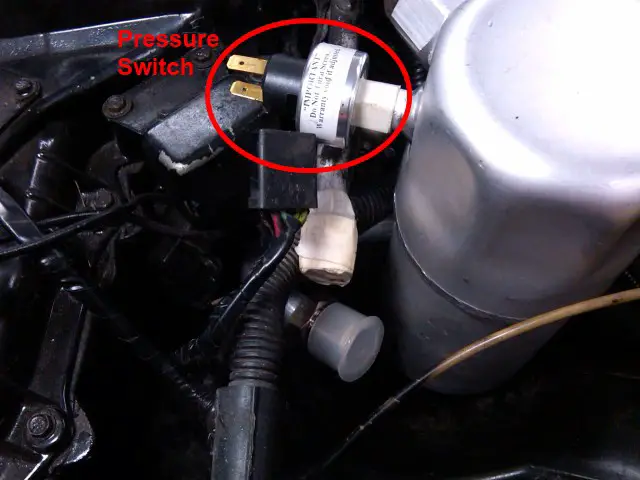
I chose to use the more modern and accurate setup with a pressure switch to cycle the compressor. This switch screws onto one of the two schrader valves on the dryer. I got one for a 1985 Monte Carlo. Here you can see the pressure switch installed and the old electrical connector.
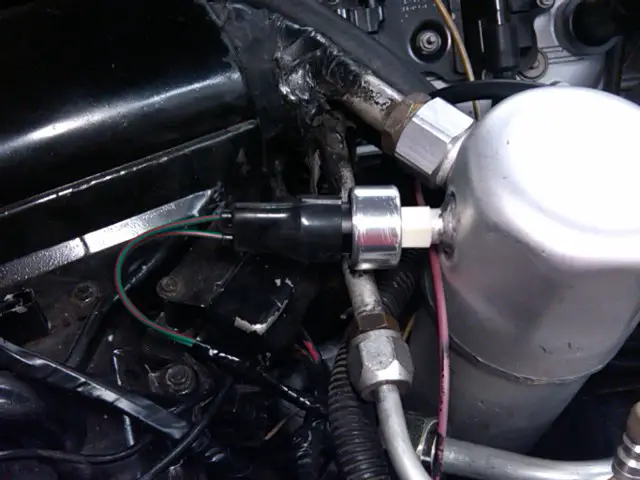
I cut the old connector off and installed a new connector to fit the pressure switch. Again, this part was for a 1985 Monte Carlo. Don't ask me why I used that specific model for some of these parts, I just did...

Lastly, which isn't really A/C, but heater related, I installed heater control valve on the heater hose. Of course, it's for a 1985 Monte Carlo with A/C.
Since the truck and some other LSx engines use a low mount A/C compressor, that would have required a frame notch, I decided to go a different route. I found a solution on the LS1tech.com forums that some others were using. I got a A/C bracket from a pre-Vortec 4.3L S-10. It will bolt right to the head and align perfectly with the other accessories on the truck motor.
This is what the A/C bracket looks as it comes off the S-10. Notice that there is a small section that I have circled. This needs to be removed. I used a cut-off wheel to do this.
This is what the bracket looks like after removing the bottom section.
In order to clear the "new" location of the A/C compressor and bracket, the water neck needs to be turned counter clockwise. The waterneck is press into the pump housing. It was pretty simple to do this. I use a torch to heat around the aluminum at the base of the waterneck. I then inserted the handle of my floor jack into the waterneck and turned it so that it was facing straight forward.
This is the hole I used to bolt the bracket to the head.
I bolted it to the accessory bolt hole in the head in the left top hand corner (facing the the engine).
You need to make a support that can locate the bracket the proper angle (left to right). You should mock this up to determine the correct position for a particular length accessory belt. Here you can see the support bar I created using pieces that I cut and welded from junk yard support bars.
The bracket is supported in the rear by this brace I fabricated from pieces of junkyard parts. This prevents the bracket from moving front to back.
This is what it looks like when mounted. Notice you will need another idler pulley on the bottom to keep the belt clear of the thermostat housing and lower radiator hose. The A/C compressor is from a 1992 F-body (Camaro/Firebird). It has a different type of hose connection on the back (than 1979 Malibu), so I used the hose assembly for a '92 F-body. Just make sure you get a hose assembly with the correct connections for your application.
The final belt routing will look like this
Since I used the 92 F-body compressor, I got the A/C compressor hose assembly for a '92 F-body, also. The line going to the condensor had to be shortened to prevent it from kinking. No biggie, I took it to a local parts house that makes/repairs A/C and hydraulic hose assemblies. The other line off the compressor bolted right to the evaporator with no modifications.
Here is another shot of the hoses going to the condensor. For the high pressure line (small line), I used my stock line and had the parts house shorten it to fit my application with the condensor fitting on the passenger side. It cost $31 to do both the compressor line and high pressure (liquid) line.
To keep all the A/C plumbing on the passenger side, I got a condensor for a 1987 Olds Cutlass. I was told 82-92 F-body (Camaro/Firebird) condensors will work as well. I had them bent down in this picture, because I planned on running the lines under the air filter, but I ended up bending the connections up and running the lines over the top of the filter.
Here you see the dryer. I got a new one for a 1985 Monte Carlo. The one from a 1979 Malibu should work fine. You can see the high pressure line with the the schrader valve port, connected to the evaporator.
In this picture, you see the temperature sensor with the electrical connector disconnected. The temperature switch is used to cycle the compressor. I don't want to use this setup because it is old.
I chose to use the more modern and accurate setup with a pressure switch to cycle the compressor. This switch screws onto one of the two schrader valves on the dryer. I got one for a 1985 Monte Carlo. Here you can see the pressure switch installed and the old electrical connector.
I cut the old connector off and installed a new connector to fit the pressure switch. Again, this part was for a 1985 Monte Carlo. Don't ask me why I used that specific model for some of these parts, I just did...
Lastly, which isn't really A/C, but heater related, I installed heater control valve on the heater hose. Of course, it's for a 1985 Monte Carlo with A/C.
") ), I like to use a site like RockAuto.com or car-part.com. They usually have some way of showing the interchange between models, be it a direct one (RockAuto can list all models a specific part fits usually), or indirect - by going through the list of available parts (car-part.com). For example, the A/C compressor for a '92 F-Body will also fit the S-Series truck that bracket came off of. The condenser will fit '85-'87 Montes, Cutlasses, Grand Prixs, and Regals (obviously Malibu & others too, but for a replacement you could ask for any of these models).
), I like to use a site like RockAuto.com or car-part.com. They usually have some way of showing the interchange between models, be it a direct one (RockAuto can list all models a specific part fits usually), or indirect - by going through the list of available parts (car-part.com). For example, the A/C compressor for a '92 F-Body will also fit the S-Series truck that bracket came off of. The condenser will fit '85-'87 Montes, Cutlasses, Grand Prixs, and Regals (obviously Malibu & others too, but for a replacement you could ask for any of these models).
